Requesting files with upload enabled links
Sync Pro and Business customers can request files with links. This feature allows people to securely send you files.
- The people you request files from do not need a Sync account.
- People can only upload to folders you specify.
- You can easily receive files from clients and customers, with a portal-like experience.
- If you give multiple people access to the same folder, you can control whether or not they can see each other’s files.
- Uploaders cannot delete or overwrite existing files in a folder.
In this article:
- How do I request a file with upload enabled links?
- How do I control the visibility of uploaded files?
- How do I enable email notifications, expiry dates and passwords (or revoke access)?
- How do you upload files to an upload enabled link?
How do I request files with upload enabled links?
You can create upload enabled links ( file requests ) from the Sync.com web panel, or your phone or tablet.
Share an upload enabled link from the Sync.com web panel:
- Sign in to the web panel.
- Hover your mouse over the folder you want to use for the file request and click the Share button. It’s best to create a new folder for each file request.
- Select the Share as link option (or Manage link option if the link has already been created).
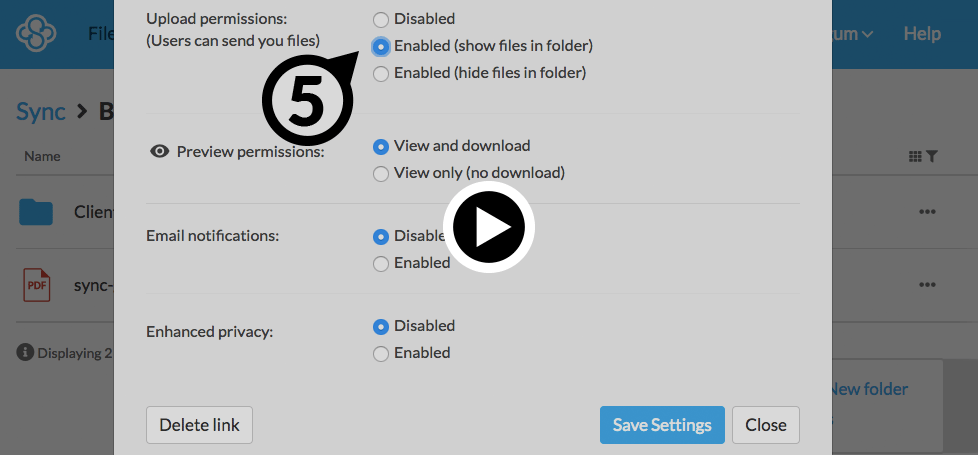
- Click the Link settings button.
- Beside Upload permissions, select Enabled (show files in folder).
- Click the Save Settings button.
Once saved, you can copy and paste the upload enabled link into an email, or send it directly through the Sync.com web panel.
Share an upload enabled link from your phone or tablet:
- Install the Sync mobile app on your mobile device.
- Open the Sync mobile app.
- Tap the (ellipsis) icon beside any folder, to open the menu.
- Tap Share as link (or Manage link option if the link has already been created).
- Tap Enable upload.
- Select Upload enabled.
- Tap Save changes.
- Tap Send link to, and choose your email program, messaging app, or other app to send the link.
Controlling the visibility of uploaded files
You can control whether or not existing files in the upload folder are visible to the people you share the link with. This is useful if you give multiple people access to the same folder, and you do not want them to see each other’s files.
Use the Enabled (show files in folder) or Enabled (hide files in folder) options when creating the link, or managing link settings.
How do I enable email notifications, expiry dates and passwords (or revoke access)?
When you share an upload enabled link you can set access permissions to control who can view the link, and what they can do with the link.
Basic permissions include custom passwords and removing links (to revoke access). Sync Pro and Business customers can set advanced permissions, such as expiry dates and activity notifications.
See the how to manage shared link permissions article for more details.
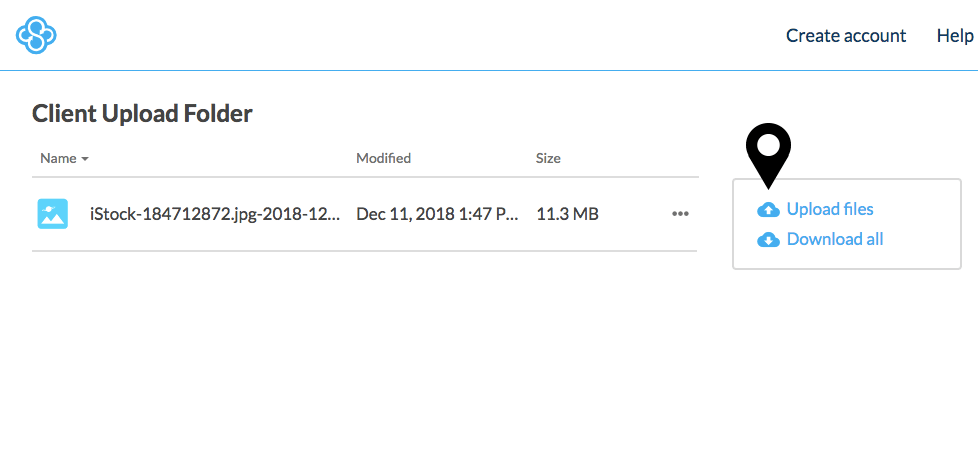
How do you upload files to an upload enabled link?
Links that are upload enabled will have an option to upload files. Depending on the visibility settings of the link, you may or may not see a listing of any existing files in the folder. To upload a new file to the link:
- Navigate to the link (if it was sent to you via email, click the link in the email to access it).
- Click Upload files from the file menu.
- Drag files or folders from your computer into the window, or click Choose files + and select as many files as you’d like from the computer file browser.
- Click Add or Open once you have selected a file.