Getting started with Pro Teams (legacy)
Note: If you purchased Pro Teams after to March 2023, click here for the latest teams support guide.
Congratulations on choosing Sync for Business! As a Pro Teams customer you can:
- Easily manage separate Sync accounts for each of your team members.
- Consolidate existing Sync accounts that your team members may have already created.
- Setup centralized folders that your entire team can access.
- Enable secure sharing with clients and customers.
- Protect your company data by keeping it securely backed up in the cloud.
In this article:
- The administrator account
- What is a Pro Teams user?
- Adding a new user account
- Transferring in an existing Sync.com account
- Managing user passwords and permissions
- Removing or replacing users
- Setting up team share folders for centralized file access
- Sharing externally to clients and customers
- Account security
- Increasing the number of user seats
- Transferring the admin account to a different user
The Pro Teams administrator account
Pro Teams includes an administrator “super-user” account. If you purchased the plan, you’re automatically assigned this role. From the Pro Teams admin panel you can:
- Setup and manage separate user accounts for each team member (employee).
- Manage passwords and delete permissions for each team member.
- Monitor access and storage space usage per user account.
- Manage account billing for all user accounts (single invoice centralized billing).
The account administrator maintains ownership of all user accounts and files.
To access the admin panel:

- Sign in to the web panel.
- Click the Users tab on the top menu bar, to access the admin panel. The Users tab is only available to the Pro Teams account administrator (not the sub users).
What is a Pro Teams user?
A Pro Teams user is defined as an internal team member (typically an employee within your organization). External people you share with (such as clients and customers) do not count as users, as Pro Teams includes unlimited external sharing.
Adding a new user account
Adding your team members as users gives each member their own Sync account and sign in credentials. If the people you are adding do not have a Sync account, they are considered new users, otherwise skip down to transferring in an existing Sync.com account, if they already have Sync accounts.
To add a new user account:
- Sign in to the web panel.
- Click the Users tab on the top menu bar, to access the admin panel.
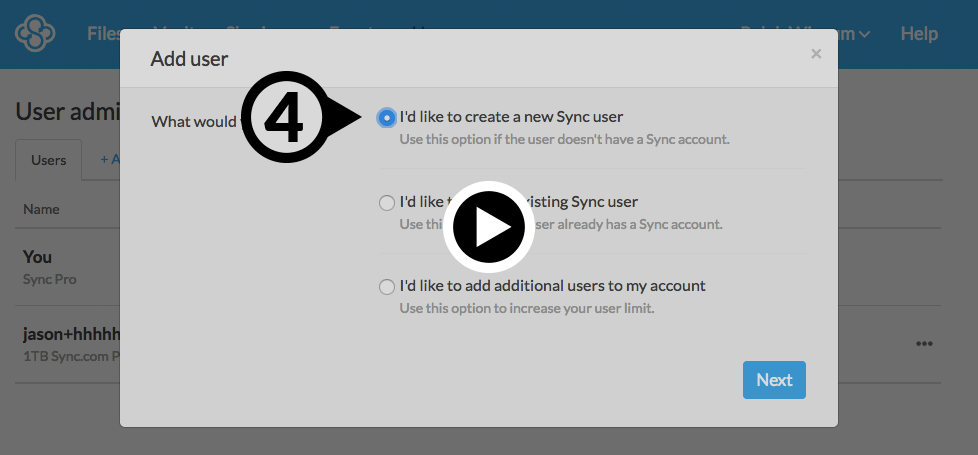
- Click + Add user.
- Select I’d like to create a new Sync user
- Click Next
- Enter the user’s email address, create a password, and set the password and deleted file permissions as required.
- Click Add user.
Once you have completed these steps the user will be sent an email verification to activate their account. You will also need to provide the user with the password you created, or instruct the user to issue a password reset (if enabled), to create their own password. Billing and upgrade options for the user will be managed exclusively under your account.
Transferring in an existing Sync.com account
You may have team members that previously created their own Sync.com accounts. With Pro Teams you can consolidate these accounts, which makes management and billing easier, and ensures that you retain ownership of your organization’s accounts and files.
Important:
In order to transfer in an existing Sync account you will need to first request a ref code from the user you are transferring in. The ref code must be provided by the person you are adding. This step is a security measure to ensure you have authorization to transfer the account.
If the user is a premium Sync user, you may also need to contact Sync support.
To transfer in an existing Sync user account:
First request a ref code – here’s how.
![]()
- Sign in to the web panel.
- Click the Users tab on the top menu bar, to access the admin panel.
- Click + Add user.
- Select I’d like to add an existing Sync user
- Click Next
- Enter the user’s email address, enter the user’s ref code, and set the deleted file permission as required.
- Click Add user.
Once you have completed these steps the user’s Sync account will be upgraded to Pro Teams, and billing and upgrade options for the user will be moved exclusively under your administrator account (these options will no longer be available for the user).
Managing user passwords and permissions
You can manage user settings from the Pro Teams user admin console. If you want to manage granular permissions per user, per folder, you would do so when creating team shared folders.
To access user settings:

- Sign in to the web panel.
- Click the Users tab on the top menu bar, to access the admin panel.
- Click the (ellipsis) icon beside the user you want to manage.
- Select User settings
Change password option: If you enabled password reset when adding the user you will have the option to change the user’s password.
Purge files option: You can control whether or not a user can permanently delete files from their account. When disabled, the user will only be able to soft delete (files in this state can be restored).
Removing or replacing users
When a user account is removed you will free up a user seat for the remainder of the current billing period, which you can use to add a new user.
To remove a user:
- Sign in to the web panel.
- Click the Users tab on the top menu bar, to access the admin panel.
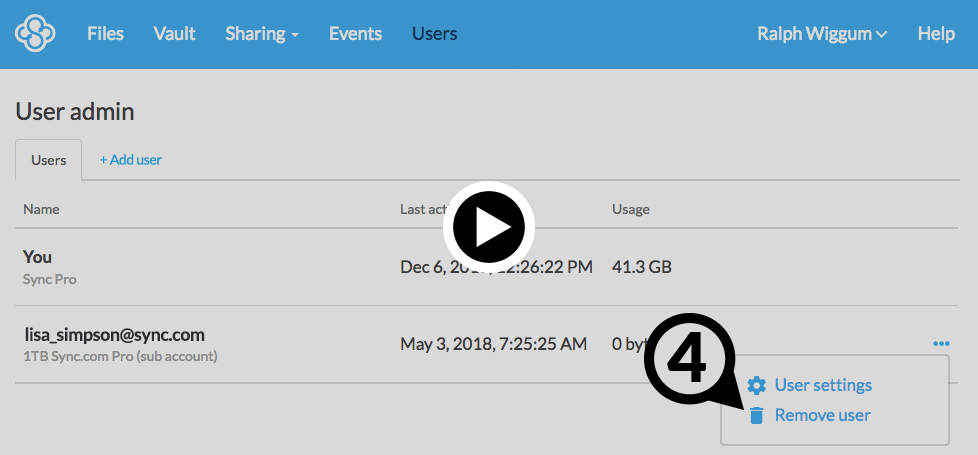
- Click the (ellipsis) icon beside the user you want to manage.
- Select Remove user
- Confirm and click Remove user
What is the purge account option?
When a user account is removed you have the option of permanently deleting the account and all files and data stored within the account, or keeping the account open.
If you choose to keep the account open, it will be downgraded to a free Sync plan, and ownership of the account will be transferred back to the email address associated with the account. Files will not be deleted if you keep the account open, regardless of the account size.
Once you have removed a user, if you no longer require the user seat, contact Sync support to have it removed, so it doesn’t renew at the end of current billing term.
Setting up team share folders for centralized file access
Once you’ve setup user accounts you will want to create team shared folders, which enable centralized file access and collaboration. With team shared folders you can:
- Automatically synchronize folders and files to some or all team members.
- Manage view only or view and edit access permissions per user, per folder.
- Track file changes per user.
- Revoke access anytime.
You can create and manage team shared folders yourself, or delegate the management of shared folders to any other user.
See the creating team shared folders article for more details.
Sharing externally to clients and customers
Pro Teams includes unlimited external file sharing with links, and the people you share with do not need a Sync account. With shared links you can:
- Send files or folders externally, to just about anyone.
- Request files (get people to upload / send you files).
- Set access permissions including custom passwords, download restrictions (preview only), expiry dates, activity notifications and more.
- Revoke access anytime.
- Share large files without bulky email attachments.
You, or any team member can create shared links.
See the creating shared links article for more details.
Account security
Users can enable security settings such as two-factor authentication from their account settings tab:
- Instruct your users to sign in to the web panel. You could also sign in on their behalf if you set their password, when creating their account.
- Click the Username on the top right side of the menu bar
- Select Settings
- Click the Security tab.
Increasing the number of user seats
If you have used up your existing user seats, you can add additional seats as follows:
- Sign in to the web panel.
- Click the Users tab on the top menu bar, to access the admin panel.
- Click + Add user.
- Select I’d like to add additional users to my account.
- Click Next
- Choose the number of additional users to add.
- Click Add user.
- Enter your billing details and click Next step to process the order.
When you add additional user seats billing is pro-rated for the remainder of the current term. This ensures that the renewal date for all users is aligned, which makes single invoice billing on renewal easier to understand. You would then be billed the full amount at the end of the term (on renewal, if you choose to renew the user seat).
Transferring the admin account to a different user
The Pro Teams administrator can transfer ownership as follows:
- Sign in to the web panel as the current administrator.
- Click the Email address or display name at the top right corner of the blue navigation bar, and select Settings.
- Click Edit beside the administrator email address.
- Enter the email address of the new administrator.
- Enter the existing account password.
- A verification email will be sent to the current administrator with further instructions.
To transfer ownership of your account you will need to change the email address as outlined above, as well as update / remove your billing profile, and enable email-based password reset (allowing the new owner to reset the account password easily).