The Sync desktop application (legacy 1.3)
The Sync desktop application is available for Windows and Mac operating systems. When you install Sync on your computer the app will create a special Sync folder.
In this article:
- How do I download and install the 32 bit Sync desktop app?
- Accessing the Sync app and Sync folder on your computer
- Adding files and folders to Sync, from your computer
- Desktop overlay icons
- Syncing status
- Desktop app settings and preferences
- Selective sync
- Updating the Sync desktop app to the latest version
- How do I confirm that the files in my Sync folder are in the cloud?
- Uninstalling Sync
How do I download and install the Sync desktop app?
The 32 bit Sync desktop app is available for Microsoft Windows XP and macOS 10.6 to 10.8. You’ll need admin privileges on your computer to install Sync. If you are running a modern version of Windows or macOS we recommend installing the 64 bit Sync desktop app.
To install the Sync desktop app:
If you don’t yet have a Sync account, create a free account from the Sync homepage before proceeding.
Show on Windows Show on Mac
- Download the 32 bit desktop app installer for Windows XP or installer macOS 10.6 to 10.8. If you are running a modern version of Windows or macOS we recommend installing the 64 bit Sync desktop app.
- On Windows run the sync-installer.exe program.
On Mac open the Sync.dmg and run the Sync.app installer. - You will be prompted to allow Sync to install software on your computer. Click Yes, Open or Run to continue.
- After a few seconds you will be greeted with the Sync installer welcome screen. If you’ve already created a Sync account, or you’re installing Sync on multiple computers, select the Use an existing account option and click Next.
- Enter your email address (Sync username) and password and click Next.
- Select where you want the Sync folder to be created on your computer. If you’re not sure don’t worry, as you can change the location later if needed.
- Enter a Device name that allows you to easily identify your computer, for example “Office Computer” or “Lisa’s Laptop”. This is helpful if you plan on using Sync with multiple computers.
- Click Next.
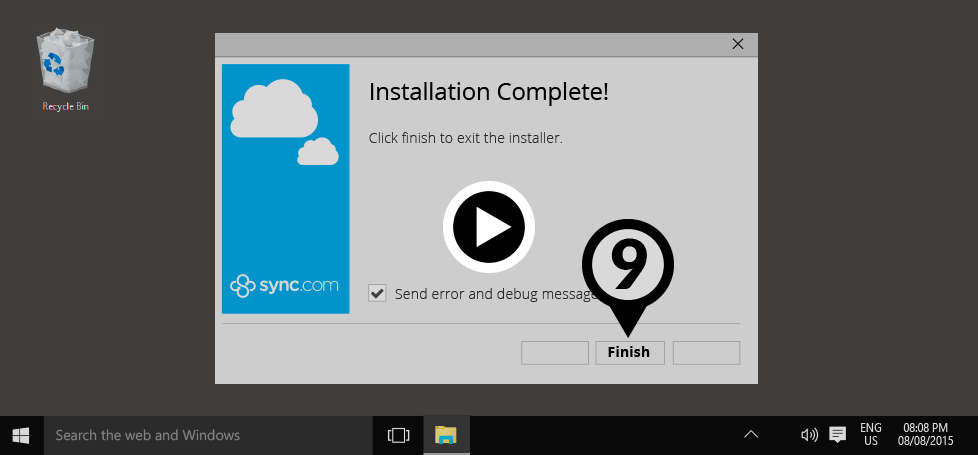
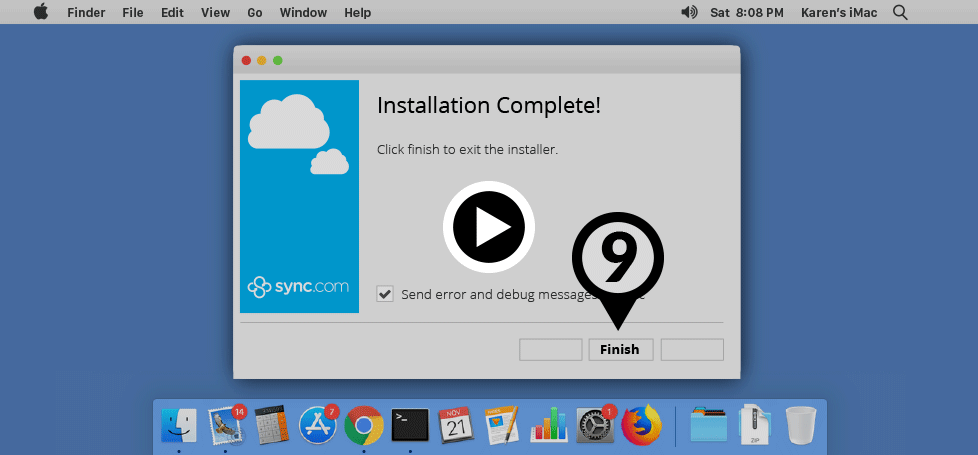
- Click Finish to exit the installer. Congratulations, you now have Sync installed!
Once Sync is installed on your computer, you can access the Sync app from the Windows system tray or Mac menu bar.
Installing Sync on multiple computers:
You can install Sync on up to five of your own computers or devices and the contents of the Sync folder will automatically synchronize to each computer. Simply follow the same steps outlined above to install on additional computers.
If you’re installing Sync on computers used by other people (for example team members, employees or family members), you should create a separate Sync account for each person. This will ensure you have control over which folders remain private in your account, and which folders are shared.
Accessing the Sync app and Sync folder on your computer
Once Sync is installed on your computer, you can access the Sync app by clicking the Sync icon on Windows system tray or Mac menu bar.
Windows system tray:
The Windows system tray is located at the bottom right corner of your screen. If you don’t see the Sync icon in the system tray after installation you may need to click the white up arrow in the system tray first.
Mac menu bar:
The Mac menu bar is located at the top right corner of your screen.
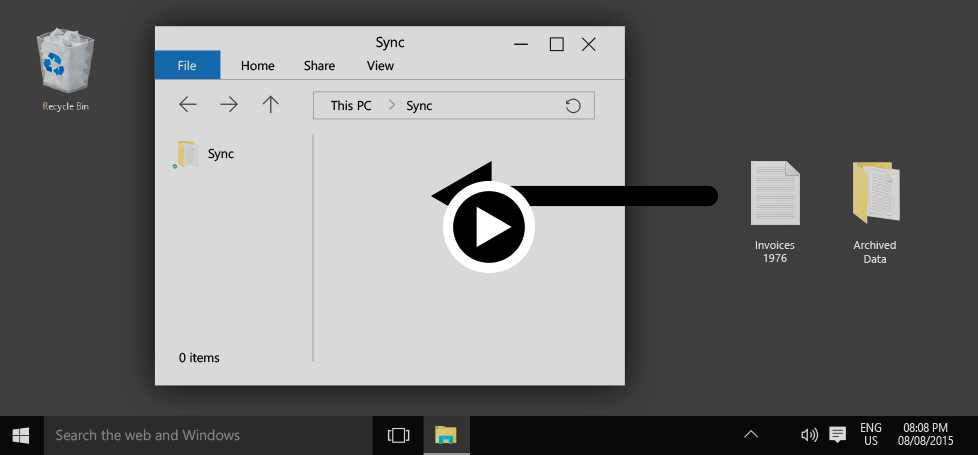
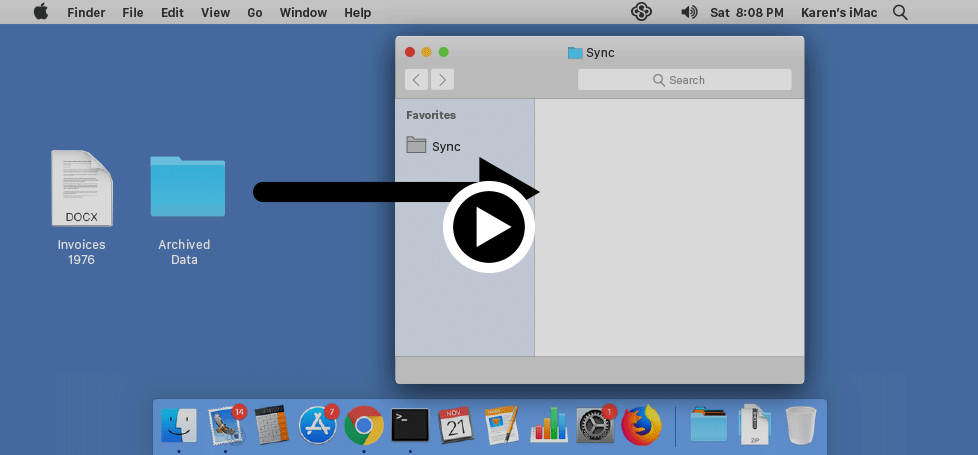
Finding the Sync folder on your computer:
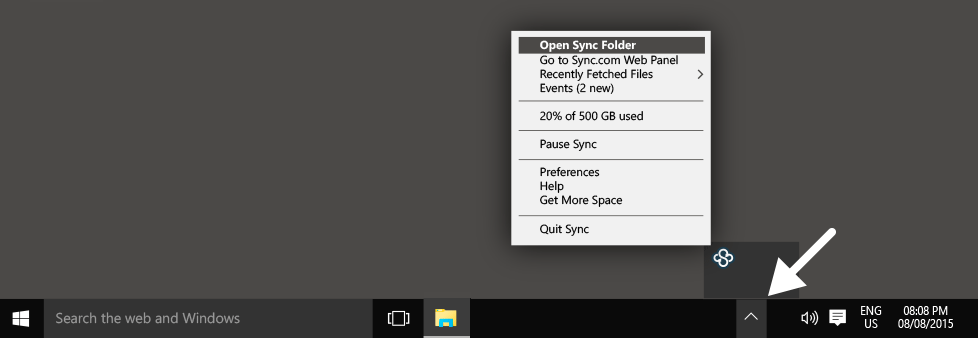
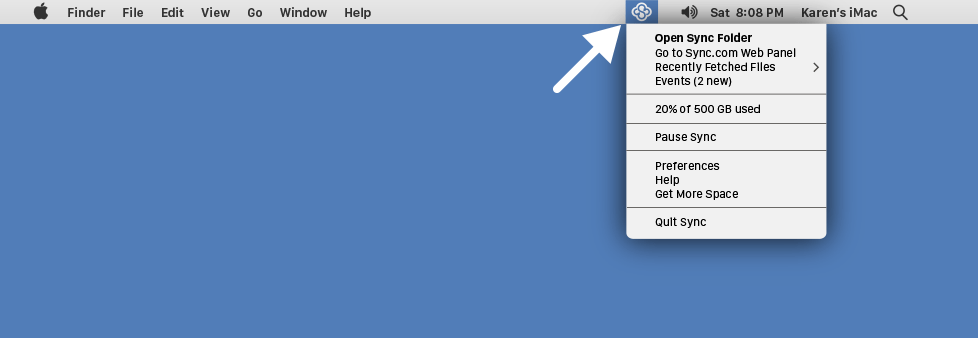
- Click the Sync icon on the Windows system tray or the Mac menu bar.
- Select Open Sync folder.
This opens the Sync folder in a new window on your computer. The Sync folder works just like any other folder on your computer.
Adding files and folders to Sync, from your computer
Once you have installed the Sync desktop app you can drag and drop files or folders directly into the Sync folder on your computer. Additionally, you can use the Save As… file menu option in most applications, to save files to your Sync folder.
Files in your Sync folder are automatically backed up to the cloud.
Adding files and folders to Sync, from your computer:
Show on Windows Show on Mac
- Click the Sync icon on the Windows system tray or the Mac menu bar.
- Select Open Sync folder.
- Now move, drag or copy files and folders from other locations on your computer, into the Sync folder.
- Files in the Sync folder are backed up to the cloud automatically.
Working directly out of the Sync folder ensures that you are always backed up.
Adding files to Sync, using the Save As… file menu option from any application:
Because the Sync folder works just like any other folder on your computer, you can save your files directly to Sync from virtually any desktop application you use. For example, to save to Sync from Microsoft Word you would:
- Open your document in Microsoft Word.
- From the File Menu in Word select Save As…
- Browse to the Sync folder on your computer and click Save.
Adding files and folders to Sync, using the Sync.com web panel:
You can also use your web browser to upload files and folders from your computer to Sync. See the Uploading files and folders to Sync, using the web panel article for instructions.
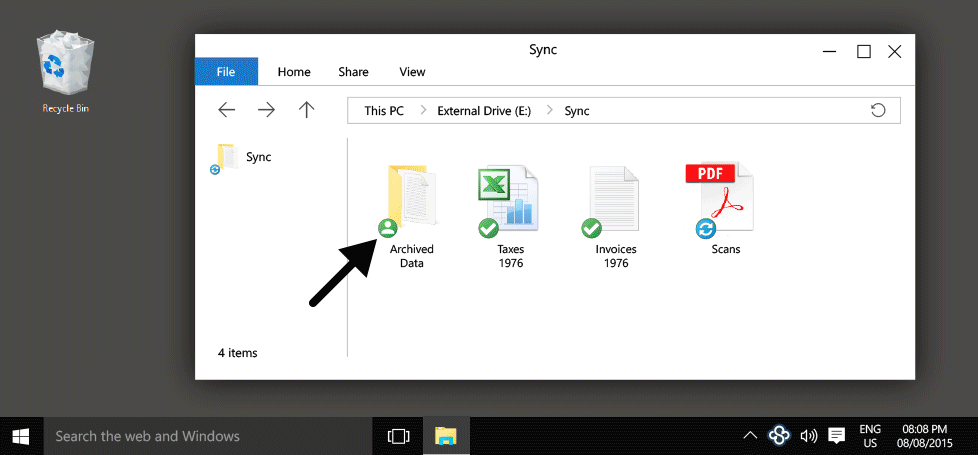
Desktop overlay icons
The Sync desktop application automatically keeps your files and folder synchronized. The app will display overlay icons on your files and folders, to let you the status of syncing.
- Overlay icons on an individual file or folder show the status of just that file or folder.
- The status icon in the Windows system tray or Mac menu bar shows overall status.
Overlay icons:
Overlay icons are displayed on all file and folders in your Sync folder.

Show on Windows Show on Mac
 In sync – a green circle with a check mark means the file or folder has finished syncing (backed up to the cloud) and is up-to-date.
 Shared – a green circle with a share icon means the file or folder has been shared as a team shared folder or a link, and is up-to-date.
 Sync in progress – a blue circle with rotating arrows means the file or folder is in the process of syncing.
 A file or folder isn’t syncing – a grey circle with a minus sign means the file or folder is not syncing. This can can occur if you have configured selective sync, or if the file name contains invalid characters. The Progress tab may provide more detail.
 Error – a red circle with an x means that Sync is unable to sync the file or folder. This can occur when your storage quota is full (can’t upload), or your hard drive is full (can’t download), or there is a technical issue preventing syncing. Contact support if you see this.
Syncing status
The app will display a status icon in the Windows system tray or Mac menu bar that shows overall syncing status.
Status icons:
The Sync status icon is located in the Windows system tray or the Mac menu bar.
![]() In sync – a check mark means all files in your Sync folder have finished syncing (backed up to the cloud) and are up-to-date.
In sync – a check mark means all files in your Sync folder have finished syncing (backed up to the cloud) and are up-to-date.
![]() Indexing – a spinning icon means that the Sync app is indexing or transferring your files. Indexing means that the app is verifying that your files are in sync. When files are transferring you can view the transfer status by clicking the spinning Sync icon.
Indexing – a spinning icon means that the Sync app is indexing or transferring your files. Indexing means that the app is verifying that your files are in sync. When files are transferring you can view the transfer status by clicking the spinning Sync icon.
![]() Paused – a circle with minus sign means that the Sync app is paused (not running). Click the icon and select Resume. If the Sync app keeps pausing contact support.
Paused – a circle with minus sign means that the Sync app is paused (not running). Click the icon and select Resume. If the Sync app keeps pausing contact support.
![]() Error – an alert symbol means that Sync is unable to synchronize your files and folders. This can occur if you temporarily lose your network connection, or if you go over quota. If the Sync app is stuck in this state contact support.
Error – an alert symbol means that Sync is unable to synchronize your files and folders. This can occur if you temporarily lose your network connection, or if you go over quota. If the Sync app is stuck in this state contact support.
Desktop app preferences and settings
Desktop app settings are specific to the computer you have installed Sync on. Account-wide settings are managed exclusively from the Sync.com web panel. Once Sync is installed on your computer, you can access the Sync desktop app preferences as follows:
- Click the Sync icon on the Windows system tray or the Mac menu bar.
- Select Preferences.
Options tab:
Run When Computer is Started – Sync automatically starts when you sign into your computer. With this option disabled you would have to manually start Sync. Enabled by default.
Show Desktop Notifications – When multiple people are collaborating, the Sync app will display pop-up notifications, letting you know if the file has changed. Desktop notifications may also include important account, file and system notifications. Enabled by default.
Use Black and White Menu Icon – This option is available on Mac computers, and changes the menu bar icon to be a more neutral color.
Show Icon Overlays – The Sync app displays status icons over every file and folder in the Sync folder when enabled. Enabled by default.
Install Updates Automatically – Automatic updates ensure you are always running the latest version of Sync, which is recommended for security and performance.
Report Errors to Server – When the Sync app encounters an error, a notification is sent to our QA team for further review. This helps our team identify and solve issues.
Account tab:
Change password – Change a forgotten password directly from the desktop app. This feature can disabled.
Export a listing if all files – Click Generate to download a .CSV document listing all files in your Sync folder and Vault. This is useful for auditing everything you have in Sync.
Uninstall – See the how to uninstall Sync articles for more details.
Network tab:
Bandwidth settings – You can limit app transfer speed, which is useful if you have limited bandwidth available. Automatic is the fastest setting.
Disk Cache – To improve performance, the Sync app temporarily stores file data in a hidden cache folder, located inside the Sync folder. The temporary cache takes up additional space on your computer and is automatically cleared from time to time. You can manually clear the cache or adjust the automatic cleanup schedule.
Configure a Network Proxy – This is an advanced network configuration that can enable Sync to work behind a SOCKS5 VPN service. The default proxy type is Automatic (no proxy).
SSL Certificates – Allow Sync to be used behind corporate firewalls that utilize trusted third-party SSL certificates. Disabled by default.
Progress tab:
The progress tab provides file transfer details, and lists any files or folders that are not syncing. If your files are not syncing, this is a good place to start troubleshooting.
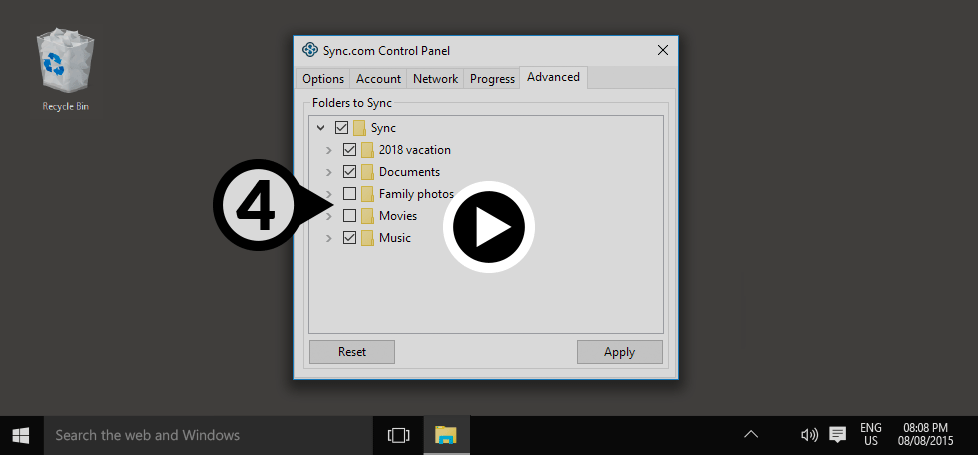
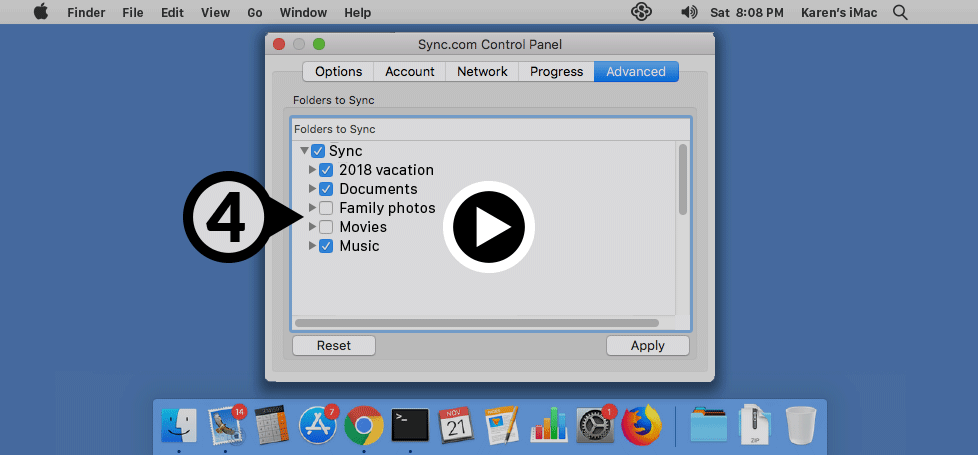
Advanced tab:
The Advanced tab allows you to control which folders get synced to each computer, a feature called selective sync. Selective sync is typically used if Sync is installed on multiple computers, and you want to control which folders (in your Sync folder) get synchronized to each computer.
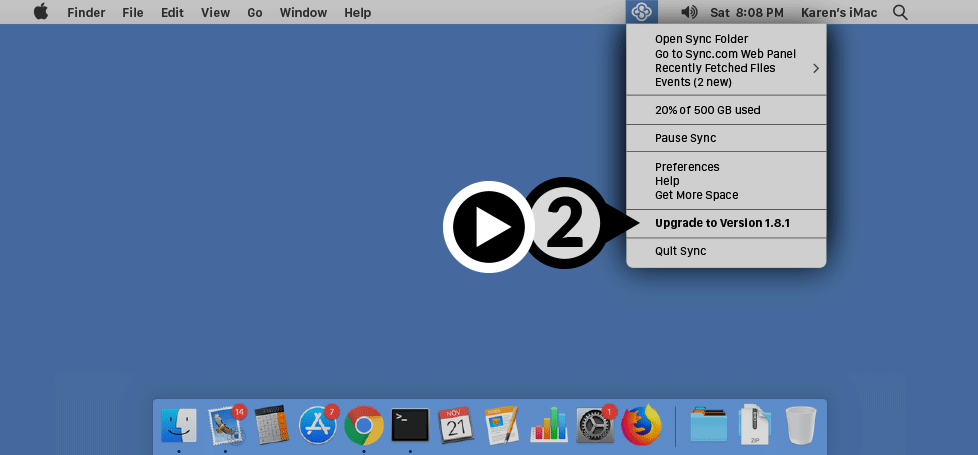
Updating the Sync desktop app to the latest version
The Sync desktop app includes an auto-update feature to ensure you’re always running the latest version. Auto-updates are enabled by default.
If you do not have auto-updates enabled, you can manually update Sync as follows:
To update the Sync desktop app from the menu:
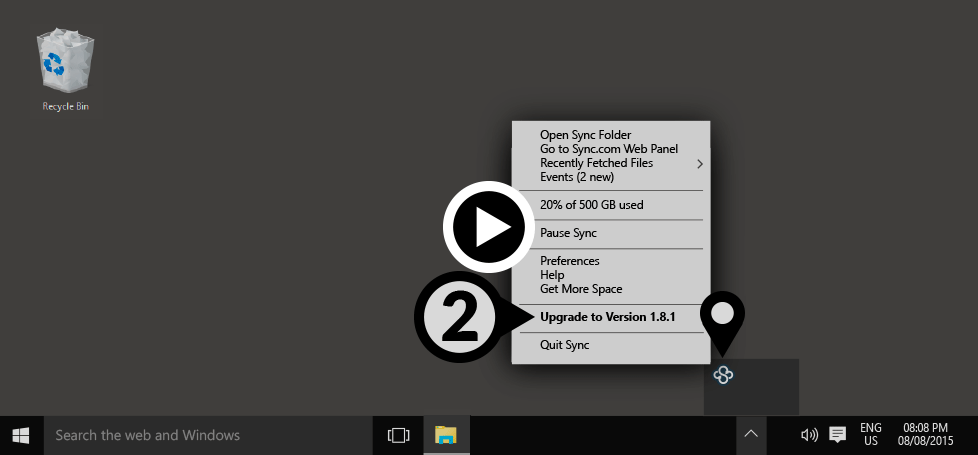
Show on Windows Show on Mac
- Click the Sync icon on the Windows system tray or the Mac menu bar.
- If an upgrade option is available it will be visible on the menu. Click Upgrade to Version if the option is available.
If the option is not available, you can update the Sync desktop app from the download page:
- Download the latest desktop app installer to your computer. The installer will upgrade an existing installation automatically.
- On Windows run the sync-installer.exe program.
On Mac open the Sync.dmg and run the Sync.app installer. - You will be prompted to allow Sync to install software on your computer. Click Yes, Open or Run to continue.
- Sync will detect an existing installation and uninstall it first. Click Yes. Don’t worry, your existing Sync folder, files and account setting will not change.
- It will take a few seconds for the installer to configure itself, at which point you will be greeted with the Sync installer setup screen.
- The installer will detect your existing account. Ensure Reuse existing account is checked, and click Next.
- Click Finish to exit the installer.
Sync is now upgraded to the latest version.
What version of Sync am I currently running?
- Click the Sync icon on the Windows system tray or the Mac menu bar.
- Select Preferences.
- Click the Account tab.
- The version is displayed at the bottom of the Account tab.
Selective sync
If you have the Sync desktop app installed on multiple computers, you can control which
folders within your Sync folder get synced to each computer. This is accomplished via selective sync as follows:
Show on Windows Show on Mac
- Click the Sync icon on the Windows system tray or the Mac menu bar.
- Select Preferences.
- Click the Advanced tab.
- By default all folders are checked, which means that all folders will sync to the computer you are configuring selective sync on. Uncheck folders you do not want synced.
- Click Apply.
Note: the Sync app does not automatically delete unchecked folders.
When a folder is deselected via selective sync it will show a grey circle with a minus sign overlay icon, signifying that it is no longer syncing and safe to delete from your computer (to free up space). If you re-check a folder in the future, Sync will re-download it from the cloud.
Controlling folder access with team shared folders:
If you are trying to use selective sync to control which folders other people can access, we recommend you setup team shared folders instead. Team shared folders give you granular control over folder access. See the how to use team shared folders article for more details.
Freeing up space with Vault:
If you are trying to use selective sync to store files or folders in the cloud only, we recommend you use Vault instead. See the what is Vault article for more details.
How do I confirm that the files in my Sync folder are in the cloud?
Sync provides a number of ways to audit and confirm that the files in your Sync folder have been successfully uploaded to the cloud.
This article covers files in your Sync folder only – see here to verify files uploaded to Vault.
The desktop app status icon and progress tab:
![]()
The Sync desktop app automatically verifies all files and folders in your Sync folder for consistency, and the status icon in the Windows system tray or Mac menu bar will display as in sync when verification is confirmed.
Important note:
To prevent syncing problems across different operating systems and platforms, a subset of incompatible characters are not supported by Sync. Files named with these characters may be skipped (not uploaded), and will be listed under the desktop app progress tab (regardless of syncing status).
You can access the Sync desktop app progress tab as follows:
- Click the Sync icon on the Windows system tray or the Mac menu bar.
- Select Preferences.
- Click the Progress tab.
If you see a file listed under the progress tab as skipped, the easiest solution would be to rename the file without these characters. View the full list of incompatible characters.
Export full file listing:
With the Sync desktop app installed, you can export a full listing of all files stored in your Sync folder and Vault, which makes auditing easier. Here’s how:
- Click the Sync icon on the Windows system tray or the Mac menu bar.
- Select Preferences.
- Select the Account tab.
- Click Generate beside export, to get a listing of all files.
A .CSV file will download to your computer, which you can open, to search for specific files and verify your files stored in the cloud.
Uninstall the Sync desktop app
See the how to uninstall Sync articles for more details.